Rock-a-Bye Baby: Affordable Cradle Woodworking Plans
Crafting a beautiful and functional cradle for your little one is a rewarding DIY project. Forget the exorbitant prices of store-bought models; with readily available materials and these detailed plans, you can build a cherished heirloom at a fraction of the cost. This guide provides step-by-step instructions and tips to help you create a safe and stunning cradle that will last for generations.
Choosing Your Wood and Tools
The success of your project hinges on selecting the right materials. Pine is an excellent, affordable choice known for its softness and workability. Its smooth surface is gentle on baby’s skin, and its light color provides a blank canvas for personalization. Alternatively, consider basswood for a slightly more durable and slightly more expensive option. Avoid woods that are prone to splintering or contain harmful chemicals. Before you start, gather your essential tools: a circular saw, a jigsaw, sandpaper (various grits), wood glue, clamps, a drill with drill bits (various sizes), screws, and wood finish (non-toxic and baby-safe). A measuring tape, pencil, and safety glasses are also crucial for accurate work and personal safety.
Step-by-Step Construction Guide
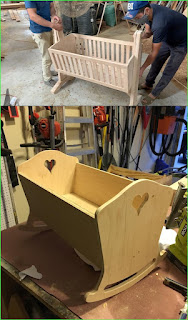
Building the Cradle Base
Start by cutting the base pieces to your desired dimensions. The plans below provide specific measurements, but you can adjust them to fit your space and aesthetic preferences. Ensure the base is perfectly square and use wood glue and screws for robust assembly. Remember to pre-drill pilot holes before screwing to avoid splitting the wood. For added stability, consider adding cross-supports underneath the base. Once the glue has dried completely, carefully sand all surfaces to remove any splinters or imperfections.
Constructing the Sides and Headboard
Next, assemble the cradle sides, paying close attention to the angle of the headboard and footboard. These pieces will determine the overall look of your cradle and contribute to its structural integrity. Use the same technique as with the baseâ€"wood glue and screws, pre-drilled pilot holes, and careful sanding. Ensure the sides are securely attached and aligned to create a safe and comfortable sleeping area for your baby.
Adding the Slats and Mattress Support
The slats provide essential ventilation and support for the mattress. Cut these to the correct length and space them evenly across the cradle’s interior. Again, wood glue and screws are your allies. Once the slats are installed, create a support structure for the mattressâ€"this can be simple cross-beams or a more elaborate framework. The mattress support should be firm but allow for slight give.
Finishing Touches and Safety Checks
Once the cradle is structurally complete, it’s time to apply a baby-safe finish. Choose a non-toxic, water-based sealant or paint that is specifically designed for children’s furniture. Apply multiple thin coats, allowing each coat to dry thoroughly before applying the next. Finally, and most importantly, conduct a thorough safety check. Inspect every joint, ensuring all screws are tight and there are no sharp edges or splinters. The cradle should be sturdy, stable, and completely safe for your little one.
Optional Enhancements
Personalize your creation! Consider adding charming details like:
- Decorative carvings or inlays.
- A painted design or a soft, neutral stain.
- Wheels for easy mobility (ensure they are securely attached and lockable).
- A padded, removable liner for added comfort and easy cleaning.
Remember, building a cradle is a labor of love. Take your time, follow the instructions carefully, and enjoy the process of creating a unique and cherished piece for your baby. The end result will be a beautiful and safe cradle that you’ll proudly display and cherish for years to come.


No comments:
Post a Comment
Note: Only a member of this blog may post a comment.